Build an air quality monitor
Contents
Plantower PMS5003 laser particle counter
The Plantower PMS5003 is a low cost laser particle counter, one of a range of sensors by Plantower that also include the PMS1003, PMS3003, and PMS7003. We have trialed the PMS3003 and PMS7003, and chose the PMS5003 as it appeared to run well in tests and reports more specific data than the PMS3003 that might be useful and is a little cheaper than the PMS7003 which does not have a cable connector. The PMS1003, PMS3003 and PMS5003 appear to share the same cable and the pins on their connector that we uses appear to be common among these, whereas the PMS7003 seems intended to mate with a PCB connector and did not come with a cable. We do not endorse any sellers or products, but offer some links to illustrate availability and pricing. We have purchased these from eBay and at a better price from Aliexpress at US$18.50 each in lots of five and they came with cable. Plantower appear to sell them on Taobao.com. The Purple Air group also use the PMS5003 (actually two for extra reliability) and their previous PMS1003 based monitoring station was tested and performed relatively well for PM2.5, and for another comparison see the World Air Quality PMS5003 and PMS7003 test. Optical particle counters do not measure mass as in standard PM measurements but make an estimate based on light scattered by particles, in particular they respond to water particles that are not measured in PM measurements. The Plantower sensors output serial data at 9600 baud that can be read by many computers and can be connected to a PC via a USB adaptor such as this USB 2.0 to TTL UART Serial Converter CP2102. We hope that soon professionally finished products will be available at a good price using such cheap sensors so you will not have to build an air quality monitor from parts, but here are instructions using cheap and commonly available parts.

ESP8266 Nodemcu
There are some very cheap WiFi enabled computer boards available are also relatively low power which is good for battery operation and some have just enough storage to record a few days of measurements even at around one sample every second, so for these compelling reasons these are our current focus. One of the most popular range are those based on the ESP8266, and these are packaged on a range of boards, and we chose the Nodemcu board as it includes a USB adaptor for connection to a PC for programming, and can be powered from a USB cable and thus from USB power supplies and importantly also from USB power banks. The Nodemcu board also breaks out the 5V power need by the Plantower sensors and breaks out enough other pins for this project. These are available on eBay and at U$3.18 including postage on AliExpress. There is a path to a more powerful device in the ESP32 recently released by the same company and this is planned to include Bluetooth support too.

PMS5003 to Nodemcu cable
The cable supplied with the PMS5003 needs modification to connect to the Nodemcu board, or to the USB adaptor linked above, or to an RPi, which have DuPont style connections. Here the cable is cut in half, giving two usable connectors, but if a longer cable is need then cut it as needed.
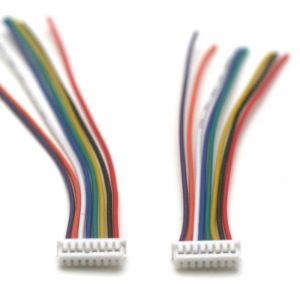

Only four wires are used in this design, the two power supply wires, and the RX and TX serial communication lines, these are pin 1 +5V (purple), pin 2 0V (orange), pin 4 RX (blue), pin 5 TX (green) – these colors have been consistent on all the cable we have seen but check their order above. The RX pin is not currently used due to software limitations (the Nodemcu software currently writes debug information on its UART output), but it might be useful in future to command the sensor to sleep to save power and to increase the sensor life, so the cabling it prepared with this in mind.

Cheap kits of DuPont connectors are available on eBay with enough parts to build a number of cables. There are also numerous crimping tools and we tried the relatively cheap SB-28B with some reservations – the connections were poor and we soldered them all just to be sure, see the tinned ends of the require wires above. The thin wires on the PMS5003 cable might not have been a great match to these connectors. Another option is to purchase pre-made DuPont jumper cables and cut them and solder them to the PMS5003 cable, and we used these for other connections below.


Below is how we crimped the cables to the plugs. The exposed wire length shown in the photo below was a little too long and was trimmed back – if it is too long it blocks the socket when connecting to the header.
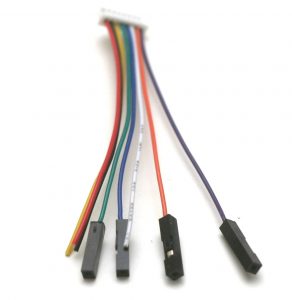
The finish on these crimped connections is rough, but they still fitted the socket casing and work as expected, see the finished cable below. The unused wires have been retained here, just in case, and can be taped back out of the way. This cable is enough to start collecting air quality data from the Plantower sensor, see the connections below.

BME280
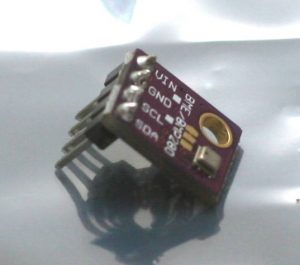
Since the optical particle counters are sensitive to water particles it seems prudent to measure the humidity as a guide to likely cross interference from and fog and steam. We have tried the SHT21 and the BME280 humidity sensors which are relatively low cost and the BME280 has good reviews, and the software we are developing supports both (and both at the same time). Both connect to the ESP8266 via two I2C signal lines, SCL and SDA. The actual sensor is a small part, so we chose a small BME280 breakout board with connections that are easier to work with, and it came with the header pins separate and we chose to use them rather than soldering the wires directly to the board, so we soldered them onto the board and chose to have the pins facing away from the sensor.

Nodemcu to BME280 and RTC cable
The design also includes a DS3231 Real-Time-Clock which keeps time relatively accurately and is very low power, and these are a very cheap addition that allow remote monitoring without depending on a server while still logging the time of measurements accurately. The boards chosen are designed for the RPi, but are easy to use in this design, and male-to-male header pins were used to connect this to the cable. This RTC also uses the I2C interface. A cable was made using pre-make DuPont jumper cables, cutting them and soldering them together to connect the two devices to one interface on the Nodemcu board. The sockets on the jump cables were removed carefully from their individual casings and put back into a four and five pin wide cases just to help organising these, but this is not really essential. Below is one finished cable and how it connects to the BME280 breakout board and the RTC.


Connected up
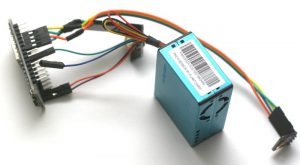

The power consumption is low enough to run for many hours on a single cell USB power bank, enough to record many short incidents or to map an area, and enough to run for a day or two on a four cell power bank.